Home Maintenance Tips and Troubleshooting for Breakdowns

Identifying the Root Cause of Unexpected System Failures
You wake up to a freezing house because the furnace stopped running overnight, or you find a puddle forming under your water heater right before leaving for work—these sudden breakdowns are exactly why mastering a few basic home maintenance tips and troubleshooting strategies is so critical. In our years serving the local area, our team at our business has found that many acute performance drops originate from minor, resolvable issues rather than catastrophic mechanical failures. When a system begins to struggle, the immediate challenge is identifying the root cause without making the situation worse.
If you need immediate assistance, explore our professional services or contact our team to schedule a diagnostic visit.
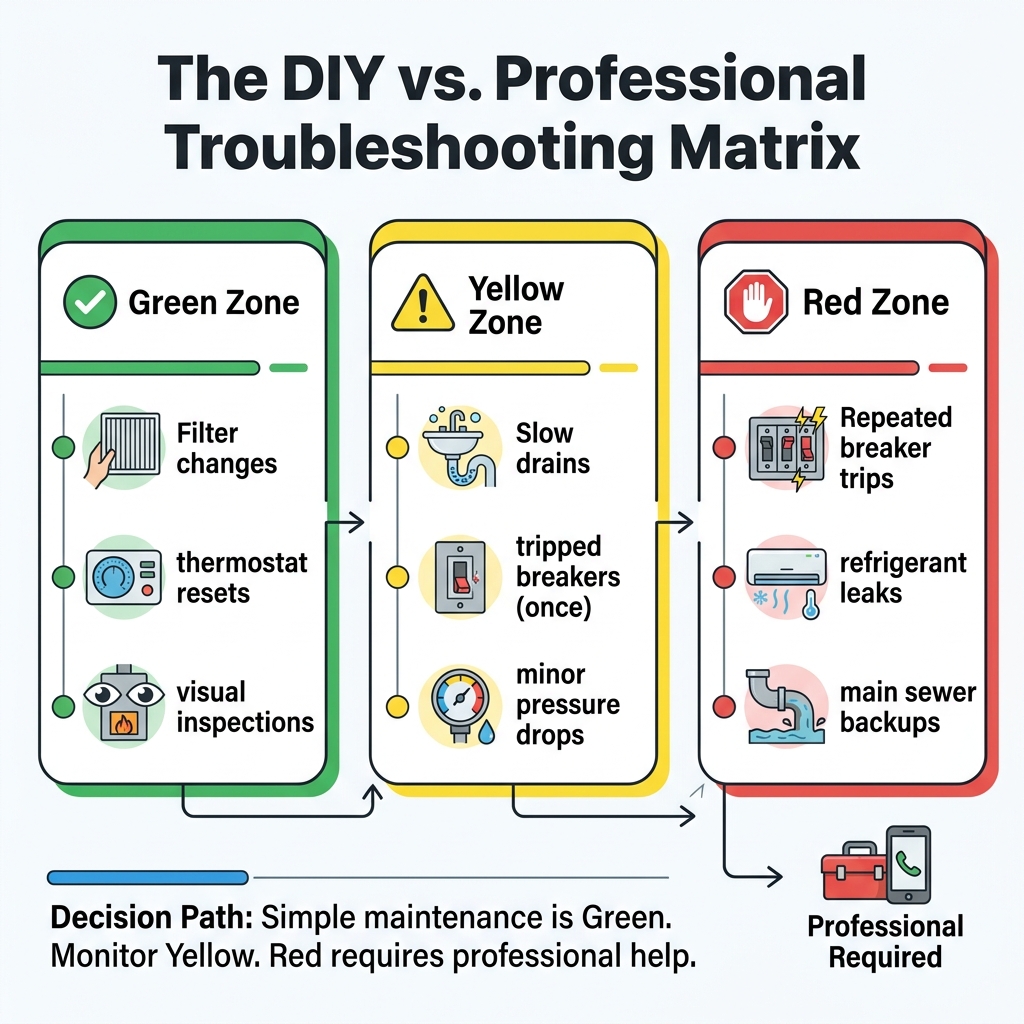
Seasonal shifts place sudden, compounding stress on residential systems. A furnace that sat dormant for six months is suddenly expected to run continuously, while plumbing pipes face rapid temperature fluctuations. This transition period exposes underlying weaknesses that may have gone unnoticed during milder weather. The key to managing these transitions is establishing a clear technical threshold: knowing exactly when a problem can be solved with safe, basic homeowner troubleshooting and when you must stop and call a professional.
Common signs of compounding seasonal stress include:
- Inconsistent temperatures: Rooms that suddenly feel much hotter or colder than the rest of the house.
- Short-cycling: Systems turning on and off rapidly without reaching the set temperature.
- Unusual operational noises: Grinding, squealing, or rattling sounds that were not present during the previous season.
By approaching these symptoms objectively, you can often isolate whether the issue is a simple airflow restriction, a tripped sensor, or a genuine mechanical fault that requires expert intervention.
The Science of Seasonal System Stress
The Problem: Home systems rarely fail without a catalyst. The most common trigger for an unexpected breakdown is a sudden shift in the environment. Local climate shifts, such as sudden temperature drops in the late fall or severe humidity spikes in the middle of summer, place an enormous burden on your home's infrastructure.
The Cause: We see this firsthand every season; when the first major weather event of a new season hits, systems are forced to operate at maximum capacity with very little ramp-up time. This sudden demand accelerates component wear. Mechanical joints expand and contract rapidly during thermal shifts, which can loosen electrical connections or cause seals to weep. Furthermore, severe humidity fluctuations directly affect electrical sensors, making them prone to false readings, and reduce overall airflow efficiency by altering the density of the air moving through your ductwork.
The Solution: Understanding these environmental triggers allows you to proactively inspect the most vulnerable components before the severe weather arrives, mitigating the stress before it causes a failure.
Environmental Triggers and Component Wear
Thermal expansion and contraction are particularly hard on exterior plumbing and roofing materials. As temperatures drop, materials naturally contract. In older plumbing systems, this contraction can expose tiny gaps in threaded joints or soldered connections, leading to microscopic leaks that only appear during the coldest weeks of the year. Similarly, rapid temperature swings can cause roofing materials to become brittle, compromising their ability to shed water effectively.
For HVAC systems, humidity is often the hidden culprit behind seasonal stress. In our experience across the local area, high indoor humidity forces your air conditioner to work twice as hard—it must remove the moisture from the air before it can effectively lower the ambient temperature. This prolonged operational cycle puts immense strain on the compressor and the blower motor. By recognizing these scientific realities, homeowners can better anticipate where and when their systems are most likely to struggle.
HVAC Airflow and Temperature Troubleshooting
When your heating or cooling system fails to maintain a comfortable temperature, our technicians typically find the issue is related to restricted airflow rather than a complete mechanical failure. A systematic, step-by-step diagnostic approach helps you safely identify the problem without risking damage to sensitive internal components.
Step-by-Step Airflow Diagnostics
- Inspect the intake vents and filter condition: The most common cause of an overworked HVAC system is a clogged air filter. A dirty filter severely restricts the volume of air reaching the heat exchanger or evaporator coil. Locate your return vents and the main filter housing. If the filter is visibly coated in dust, pet hair, or debris, replace it immediately. A restricted filter can cause cooling coils to freeze solid or heating elements to overheat and trip safety limits.
- Verify thermostat calibration and communication: Sometimes the equipment is functioning perfectly, but the brain of the operation is failing. Check the thermostat display. Is it blank? Replace the batteries. Is it set to the correct mode (heating vs. cooling)? Dust inside the thermostat housing can also interfere with temperature sensors. Gently blow out any accumulated dust and ensure the device is securely mounted to the wall.
- Check the outdoor condenser for seasonal debris: For air conditioning and heat pump systems, the outdoor unit must have unobstructed airflow to exhaust heat. Walk around the exterior unit and look for seasonal debris. Overgrown bushes, fallen autumn leaves, or accumulated grass clippings can choke the intake fins. Carefully clear a two-foot perimeter around the entire unit.
When to stop: If you have replaced the filter, verified the thermostat, and cleared the outdoor unit, but the system still blows lukewarm air or makes loud grinding noises, you have reached the technical threshold. These are exact symptoms of a refrigerant leak, a failing compressor, or a faulty capacitor. These issues require specialized gauges and handling licenses, meaning it is time to call a professional.
Plumbing Diagnostics: Leaks, Pressure, and Drainage
The Problem: A pattern we see often is that plumbing issues mask themselves as minor inconveniences—a faucet that takes too long to fill a glass, a slow-draining shower, or a tiny puddle near the utility closet. However, these symptoms can quickly escalate into significant water damage if the root cause is not isolated.
The Cause: Sudden water pressure drops are frequently caused by sediment buildup in aerators, especially after seasonal municipal water system flushes. Slow drains are typically the result of localized clogs in the trap, but if multiple fixtures back up simultaneously, the blockage is deep within the main sewer line. Seasonal weeping near water heaters or exposed pipes is usually driven by the thermal expansion and contraction discussed earlier.
The Solution: By isolating the specific location and behavior of the plumbing issue, you can determine if a simple cleaning will suffice or if a major line repair is necessary.
Isolating Water Pressure Drops
To track down a sudden water pressure drop, start by determining if the issue is isolated to a single fixture or affects the entire house. Turn on multiple faucets. If only the kitchen sink is struggling, unscrew the aerator at the tip of the spout. You will likely find small mineral deposits or grit blocking the screen. Rinse it out and reattach it.
If the pressure drop is house-wide, you must test for hidden leaks. First, ensure the main shutoff valve is fully in the "open" position—sometimes these valves are accidentally bumped or partially closed during other utility work. Next, perform a water meter test. Turn off all water-consuming appliances and fixtures inside and outside the home. Go to your water meter and watch the low-flow indicator (often a small red triangle or a digital decimal). If it is moving while all water is shut off, you have a hidden leak somewhere in the system, and professional leak detection is required.
Exterior Envelope and Roof Inspections
The exterior of your home acts as the primary defense mechanism for your interior systems. When the envelope is compromised, interior systems are forced to compensate. For example, wet insulation caused by an undetected roof leak severely decreases your home's thermal resistance, forcing your HVAC system to run longer cycles to maintain the set temperature.
Start your exterior inspection with the gutter system. Gutter blockages are directly connected to potential foundation and basement moisture problems. When autumn leaves or spring seed pods clog the downspouts, water overflows and pools directly against the foundation. Over time, this hydrostatic pressure forces moisture through concrete pores, leading to damp basements that strain your indoor dehumidifiers and promote mold growth.
Next, perform a visual inspection of your weather stripping and exterior flashing. Look for cracked caulking around window frames or gaps beneath exterior doors. When assessing the roof from the ground with binoculars, understanding the differences in metal roof vs. asphalt shingles maintenance helps you spot material-specific vulnerabilities. Asphalt shingles may show curling edges or missing granules after a harsh summer, while metal roofing might exhibit loose fasteners or compromised rubber washers after severe wind events. Identifying these envelope breaches early prevents a cascade of interior system failures down the road.
Electrical System Safety Checks
At our business, we always advise that electrical troubleshooting requires the highest level of caution. The goal here is safe, non-invasive observation. You should never open sealed system cabinets, bypass safety limits, or remove the dead-front cover of your main breaker panel.
- Identify and reset a tripped breaker: If a specific circuit loses power, locate your main electrical panel. A tripped breaker will not be fully in the "OFF" position; it usually rests in the middle. To reset it properly without causing surges, firmly push the switch all the way to the "OFF" position until you feel a click, then push it firmly back to the "ON" position. Crucial rule: If the breaker immediately trips again, do not attempt to reset it a second time. This indicates a hard short or a failing component, and forcing it on can cause an electrical fire.
- Test and reset GFCI outlets: Ground Fault Circuit Interrupter (GFCI) outlets are typically found in kitchens, bathrooms, and exterior walls. After seasonal storms or power fluctuations, these sensitive outlets often trip to protect against shocks. Press the "RESET" button firmly. If it pops back out immediately, the outlet may be faulty, or there is moisture in the line.
- Routine checks for smoke and carbon monoxide detectors: Hardwired detectors often have battery backups that chirp when voltage drops. During seasonal transitions, press and hold the test button on each unit until the alarm sounds. If a unit is more than 10 years old, the internal sensors are likely degraded, and the entire unit should be replaced according to manufacturer guidelines.
The Professional Diagnostic Threshold
There is a clear boundary between safe DIY troubleshooting and necessary professional intervention. Basic resets and visual inspections are highly effective for catching simple airflow restrictions or tripped safeties. However, modern home systems are complex, interconnected networks of high-voltage electricity, pressurized refrigerants, and combustible gases.
Reliable local experts approach diagnostics systematically with specialized tools, contrasting this with generic online guesswork. A professional uses multimeters to test exact voltage drops, manometers to check gas pressure, and thermal imaging to find hidden duct leaks. This systematic approach not only prevents recurring failures but ensures that all repairs comply with strict local building codes.
| Diagnostic Action | Safe for Homeowners (DIY) | Requires Professional Expert |
|---|---|---|
| Filter replacement & vent clearing | Yes – Routine visual check | No – Unless accessing sealed ductwork |
| Resetting a tripped breaker | Yes – One time only | Yes – If it trips repeatedly |
| Clearing external AC debris | Yes – 2-foot perimeter clearance | Yes – If internal coils need chemical cleaning |
| Investigating refrigerant lines | No – Visual check for ice only | Yes – Requires EPA certification and gauges |
| Main sewer line backups | No – Plunging is ineffective here | Yes – Requires sewer camera and auger |
Securing Your Home with Expert System Diagnostics
Structured troubleshooting saves time, reduces frustration, and prevents minor issues from escalating into expensive disasters. By understanding the science behind seasonal system stress and following objective diagnostic steps, you can confidently isolate the root cause of many common household disruptions. Always prioritize safety and accuracy when dealing with complex system failures—if a problem crosses the technical threshold into the red zone, stepping back is the smartest decision you can make.
When basic troubleshooting ends, professional expertise begins. If you are facing an unresolved system failure, contact our team to schedule a comprehensive diagnostic. A clear, well-structured technical evaluation will detail exactly what caused the failure and provide the correct sequence of actions to resolve it safely.
Frequently Asked Questions
How do I know if my system needs a professional diagnostic?
You need a professional diagnostic when basic troubleshooting—like changing filters, replacing thermostat batteries, or resetting a breaker once—fails to restore normal operation. If your HVAC system is making grinding noises, blowing warm air on cooling mode, or if a breaker trips repeatedly, these are signs of internal component failure. Continuing to run a system under these conditions can cause severe secondary damage, making professional tools and testing mandatory.
What are the first steps in troubleshooting a home system failure?
The very first step is safely isolating the symptom through visual inspection and basic resets. For HVAC, check the air filter, verify the thermostat settings, and ensure the outdoor unit is clear of debris. For plumbing, determine if the issue is isolated to one fixture or the whole house by testing multiple faucets. Always start with the simplest, non-invasive checks before assuming a major mechanical failure has occurred.
When should I call a professional for home repairs?
You should call a professional immediately when a repair involves opening sealed equipment cabinets, handling pressurized refrigerants, or working with high-voltage electrical panels. Additionally, if you suspect a hidden water leak behind a wall or a main sewer line blockage, specialized diagnostic equipment is required. Attempting DIY repairs on these complex systems can void manufacturer warranties and create serious safety hazards.
What is included in a seasonal home maintenance schedule?
A comprehensive seasonal schedule includes inspecting the exterior envelope, clearing gutters, and performing preventative maintenance on mechanical systems. This involves replacing HVAC filters, flushing sediment from water heaters, testing smoke and carbon monoxide detectors, and scheduling professional tune-ups before peak summer or winter weather arrives. Staying ahead of the weather ensures your systems are not caught off guard by sudden thermal shifts.
What are the most common home maintenance issues during weather transitions?
The most frequent issues include HVAC airflow restrictions, microscopic plumbing leaks due to thermal contraction, and tripped electrical breakers from sudden high-capacity loads. As temperatures drop or humidity spikes, materials expand and contract, exposing weak points in seals and joints. These transitions are statistically the most vulnerable times for residential infrastructure.
Is it safe to reset a repeatedly tripping HVAC breaker?
No, it is never safe to repeatedly reset a breaker that continues to trip. A breaker trips to protect your home from an electrical short, an overloaded circuit, or a failing mechanical component like a seized compressor. Forcing the breaker back on bypasses this vital safety mechanism and drastically increases the risk of an electrical fire or permanent equipment damage.

Service Areas
